|
|
|
|
Common Components Help | AEF Help |
Adding a 3D Document
If your system is set up for 3D viewing, you can add 3D JT files to folders and routes. People with the appropriate access can view and mark up these files in the e-Vis or VisMockup viewer applications.
When adding a JT file, you can attach a single component JT file or one that is the root of an assembly of files. If you attach an assembly JT file, all the component files that it points to will also be added. If the root JT file points to JT files that in turn point to assembly files, then all these files are added and so on.
Unlike other documents in Team Central, you don't add new versions of JT files by locking them for edit and then checking in new versions. The Lock for Edit and Checkin icons are not available for JT files. Instead, you add new versions of JT files by adding them as if you were adding the first version, by clicking on Upload External JT File. Then you'll be given the option of creating a new version if the file already exists, as described below.
You can also maintain updates to JT files by saving markups in the VisMockUp viewer application. When you save a markup in this viewer, Team Central saves the markup with the document. Every person who views the JT file will be able to see all markups that have been added. For example, in VisMockUp, you save markups as layers and each layer file is saved along with the JT document. In e-Vis viewer, you save markups by capturing the image and saving the 2D image that shows your markups as a .CGM file. These CGM files are not added to Team Central but you can check them into the folder that contains the JT file.
Also unlike other documents, you cannot add a JT file to multiple workspace folders.
To add a 3D JT file to a folder or route
- View the content of a folder or route: click the folder name from the folder list or click Content from the route's category list.
For instructions on accessing the category list for a folder, see Viewing Information for a Folder or Subfolder. For instruction on accessing the category list for a route, see the MatrixOne Common Components User Guide.
- From the Content page, click Upload External JT File. (If this option isn't available, then 3D viewing and upload hasn't been set up for your system.)
Depending on how your system is set up, a File Checkin/Checkout Login page may appear. If so, enter the same Username and Password that you enter when logging into Team Central and click Login.
! Do not use the standard Upload External File link for 3D JT files. If you do, the system will not recognize it as a JT file and will not open a 3D viewer when users attempt to view the file. The file also will not be converted to a binary file and will be very large. - If a security warning dialog appears, click Yes.
The Upload External File page opens.
- In the File box, type the full path for the file or click Browse to select the JT file.
File names cannot include any of these special characters: ; \ / ? < > + = : & @ $ , * |.
- In the Checkin Document page, enter a Description for the document.
- If you are adding the JT file to a route, specify a folder or subfolder to add the document to by clicking
for the Workspace Folder box. From the list of folders for which you have Read access, choose a folder. If the route's scope is a folder or subfolder, then only that folder or its subfolders can be chosen.
- Click JT FileCheckIn.
A dialog appears, listing options for how you want the system to handle files that are already added with the same name and how you want the system to show the document structure.
- Using the options at the top of the dialog, choose how you want the system to handle files that are already checked in with the same name as the ones you are adding, including the component files within assembly files. All three options apply to files being added that already exist in any folder for which you have Write access within the current workspace. Also if any of the files already exist in a folder to which you do not have Write access, then the upload fails and you will receive an error message.
Connect to existing documents--If the system finds existing files with the same name, it does not add the duplicate files or create new revisions. Instead it adds the files that are not duplicates and connects them to the existing files. The system makes the connections so the uploaded file structure is maintained. If the top level document already exists, then the upload fails with an error warning the user of the existence of the top level file.
Replace root file and version child documents--If the system finds existing files with the same name, then the system adds the files and creates a new version. If the top level document exists in any folder, then it is replaced with the new file. Also the system creates all necessary connections to reflect the uploaded structure.
Version existing documents--If the system finds existing files with the same name, then the system adds the files and creates a new version. If the top level document exists in the folder being uploaded to, then it is versioned and the file is checked into the new version. If the top level does not exist in the folder but exists in another folder, then the upload fails. Also the system creates all necessary connections to reflect the uploaded structure.
Fail on duplicate--If the system finds existing files with the same name, the upload fails.
- Using the two options under Select option for subassembly creation, choose how you want the system to handle subassembly files within the JT file. If the JT file has no subassemblies, then these options do not apply.
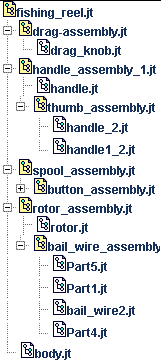
With Subassemblies--Choose to have the system upload all subassembly and component files within the JT file. Users can view the entire subassembly structure, as shown below.
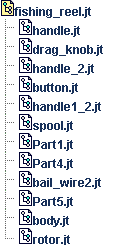
No Subassemblies--Choose to have the system upload only the component files within the JT file. No subassembly files are uploaded. When users view the structure of the files, the system will show the root JT file and all component files directly under it, regardless of where they are actually located within the subassembly structure, as shown below.
- Using the options under Select option for partial assembly upload, choose how you want the system to handle an assembly that is missing one or more component or subassembly files:
Allow Partial Assembly Upload--Choose this option to have the system upload an assembly even if it is missing one or more files.
Disallow Partial Assembly Upload--Choose this option if you want the upload to fail if the assembly is missing one or more files.
- Click Submit.
The file is copied from the local directory to the folder. If the JT file is the root of an assembly, all component files in the assembly are also added. Subassemblies are added if you chose With Subassemblies.
- At the confirmation message, click OK.
|
|
|
|
| Last updated: 03/30/04 13:47:35 |